HTML5 is a newer version of HTML. It works just like HTML but has added features.
HTML is a programming language used to make Web pages. It uses tags to specify the content in different parts of the page. It, also, uses the tags to perform a variety of functions (like obtain user input) and to format the page.
In this tutorial, we will look at some of the things we can do with HTML5 with samples of the code to help it make sense. To see what the code does, simply click on the image. This will open a new tab with the page generated by the code.
After we look at HTML5, we will briefly look at CSS3, which is used to format HTML pages.
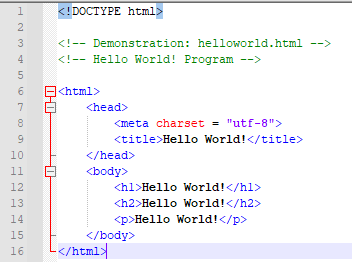
We'll start with a simple example and everyone's favourite first program: Hello World!
One very important thing to note about tags is that every tag <tag> needs to have a closing tag </tag>.
The line numbers are shown to help us understand what is going on but they are not part of the code.
In this example, there are two things that are necessary for every HTML document. The first is in line 1. This statement declares the document type as HTML. The second crucial tag is the HTML tag in line 6.
Inside the HTML tags, there is a head and a body. The head indicates the character set being used and the title. The title is what is displayed at the top of the browser in the tab.
The body is the meat of the program. In this example, we show 3 built-in formatting types: h1, h2, and p. See the example for the difference.
The Hello World! program above introduces us to Page Structure Elements. These are the tags we keep mentioning. They lay out the structure of the page.
Line 7 marks the beginning of the Head page element which contains the Title page element.
Line 11 marks the beginning of the Body page element. Within the Body, we see 2 Heading page elements: h1 and h2, and a Paragraph page element: p.
These elements are standard from HTML. We will now look at a program that uses some page elements that are new to HTML5 along with more standard HTML types.
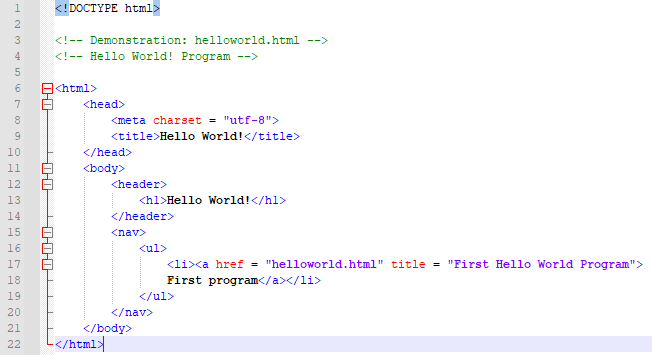
The first new element introduced in this example is the Header element in line 12. Headers are new to HTML5 and are used for title information or branding. They can, also, be used to hold a top navigation menu.
The second new element is the Nav element. This is, also, new to HTML5. It's used to hold navigation elements. In this example, it contains a simple link to the first Hello World! program.
Nested in the Nav element are the UL and LI elements. These are Unordered List and List Item, respectively. As expected, they are used to hold an unordered list of items.
In this program, the list holds one item: an A element or Anchor element. Anchor elements are used to hold links to other pages.
If you hover over the link on the page, you will see that the Title information is displayed.
The programs above demonstrates different ways to organize and display HTML document content but how do we make our programs more interactive?
The answer is by gaining user input. User input can make our pages more dynamic and allow us to collect information from our users. Maybe we would like them to fill out a form or maybe we just to offer them choices in a quick and convenient way.
HTML offers a variety of standard input types: buttons, text fields, checkboxes, etc. but HTML5 offers even more options. The next example highlights some new input types.
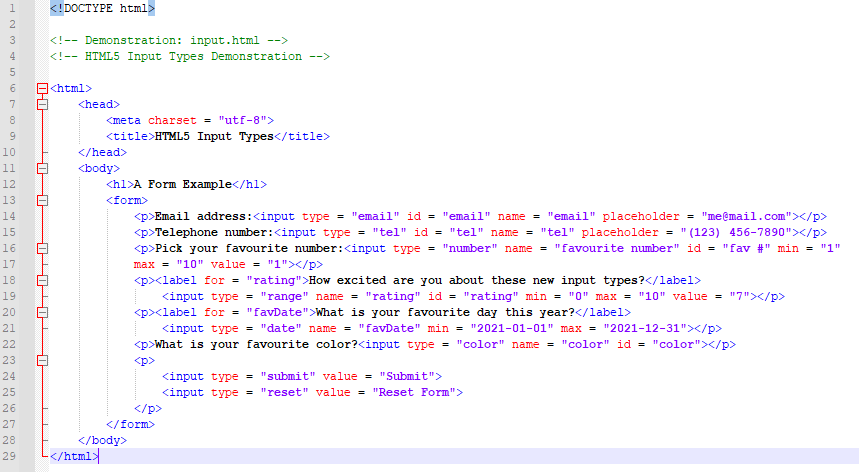
Additionally, two older input types are used: Submit (line 24) and Reset (line 25).
We will now, briefly, talk about the attributes used in this example.
The first attribute is Type. The type specifies what kind of input we wish to obtain. If no type is specified, the default is Text.
The second attribute is ID. The ID is used to identify the attribute. It is often used in stylesheets and in JavaScript programs to manipulate the element. It is crucial that the ID be unique as it is a global value.
The third attribute is Name. The name is used as a reference when the form data is submitted and can be used by JavaScript.
The fourth attribute is Placeholder. This attribute is kind of like a default value but allows the user to overwrite without having to delete it.
The fifth attribute is Min. For number types, this is the minimum allowed value.
Likewise, the sixth attribute, Max, is the maximum allowed value.
The eighth attribute, Value, is the default value set on the form. Unlike Placeholder, this attribute does need to be deleted, if the user wishes to enter a different value. For the Submit and Reset types, the value is the text displayed on the buttons.
We will conclude this tutorial with a brief look at CSS. CSS is used to format HTML pages. In this example, we will demonstrate CSS by styling the original Hello World! program.
CSS style elements can be used within an HTML document or an HTML document can reference an outside stylesheet. In this example, we will use the latter approach so that we can simply show the CSS code.
To reference an outside stylesheet, we need to add some code into the Head of the HTML page. For this sheet, the code would be <link rel = "stylesheet" type = "text/css" href = "sampleStyle.css"/>.

For only a few lines of code, this stylesheet makes some dramatic changes to our program.
We won't go through it in great detail but will point out a few important things.
The first thing to note is that the comments are in a different format than they were in the HTML documents.
Next, notice that the beginning of each line starts with a Page Structure Element. We have h1, h2, and p. These correspond with the elements in our HTML document.
For text within the h1 tags, the attributes on the stylesheet that are listed in the curly brackets after h1 are applied.
The same is true for h1 and p.
The attribute names are fairly self-explanatory. Compare them to the program output to determine what each does.
One last note about this stylesheet: Margins are outside borders while padding is the space within them.