XML is a markup language like HTML. As such, it uses tags to specify elements in the document.
XML is useful when working with sets of data. Its utility in data processing will become apparent in the sections about XML Stylesheets, and Schemas and Document Type Definitions.
After we look at XML, we will briefly discuss Ajax, a powerful tool in the fight against slow page loading.
For this tutorial, let's imagine we are back in 1995, running a video rental store...
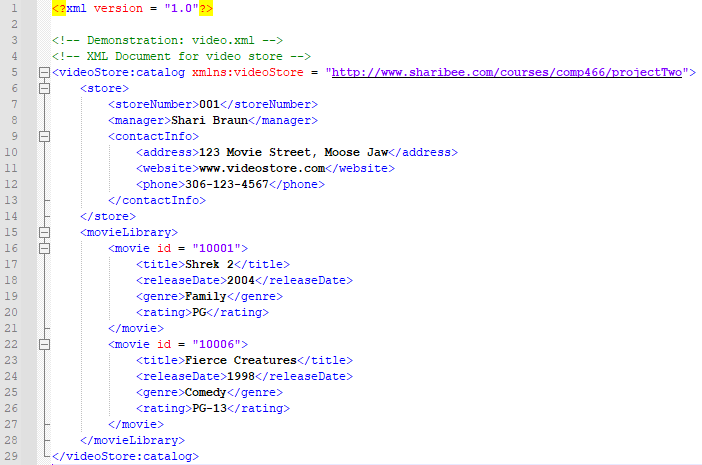
We want to store information about movies and decide to put the data into an XML document. It might look a little something like this:
So, basically, XMLs hold data in a structured format using tags. The most obvious difference between HTML tags and XML tags is that XML tags are user-defined. Here, I am telling the XML parser that the Store element has an element called StoreNumber that has the value 001.
Let's backtrack a bit, though. The first line of this document indicates that we are using XML version 1.0.
The third and fourth lines are comments. Note that commenting has the same format as HTML.
Line 5 is interesting. XML uses namespaces. Even though we mentioned that the tags are user-defined, there are, also, some built-in tags in XML. Since we don't know all of those tags, we could, accidentally, define a tag with the same name as a built-in tag. This would create a conflict so to avoid the problem, we can designate a namespace.
Namespaces are defined using xmlns: then assigning a URI to the namespace. Using a URI makes sure the namespace will be unique. In this case, the namespace is called videoStore and the associated URI is http://www.sharibee.com/courses/comp466/projectTwo.
We will visit namespaces again when we look at Schemas.
XML document primarily consist of elements and attributes. For the most part, elements are the words in the tags. Here, we have many elements: storeNumber, website, movieLibrary, movie, etc. The data associated with each element is between its tags. Attributes are data within the tag. For example, the element movie has an attribute named id. The id attribute for Shrek 2 is 10001. When we process our XML document, we can do different things with elements and attributes. We'll get into that a little more when we discuss XSL.
When you're looking at this XML sheet, consider how easy it would be to add a new movie to this collection. The beauty of XML is that we can add data to the document without having to worry about the associated documents. We can have any number of records and it doesn't impact our stylesheets or any associated schemas.
If you click on the image of the XML document, you may see a message indicating that there is no stylesheet associated with it. As a result, the browser displays the document tree which looks a lot like the original XML document. To get the polished HTML page look, we need to build an XSL file for our document.
We ran into a bit of a problem when we tried clicking on the above document. Let's fix that by creating an XSL document for it.
The first thing we need to do (which won't be shown here) is to associate the stylesheet with the XML document. To do that, we add this line to the XML document right after line 1 in the above document: <?xml-stylesheet type = "text/xsl" href = "videoStyle.xsl"?>. The filename after href is the name of our stylesheet.
Now, the formatting of this page is, well, not the best. It, nicely, emphasizes the importance of using a CSS stylesheet to keep your code tidy and your pages looking good.
If you recall from the HTML tutorial, we were able to link a CSS stylesheet with our HTML document. We can do the same thing with an XSL document. If we want to apply a stylesheet to the HTML page that the XML document will become, we can reference the stylesheet in our XSL document. We won't do that in this example but be aware that it is a good option for maintaining a consistent look across pages.
As for the content of this document, we have much to discuss.
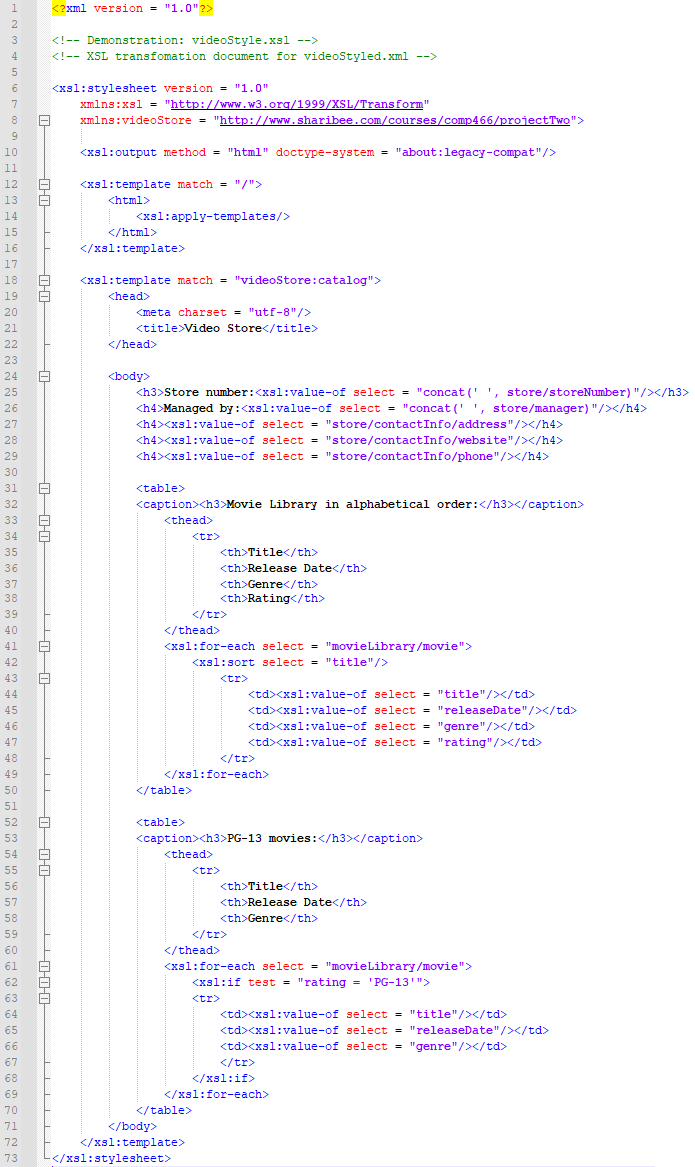
Lines 1, 3, and 4 are the same as our XML document, except for the file name in the comments.
Line 6 indicates that this is a stylesheet. This is a tag and you can see that it is closed in line 73.
Lines 7 and 8 indicate the namespaces we will be using in the stylesheet. The XSL namespace indicates that we are referencing W3's Transform site. This line is required if the purpose of your XSL document is to transform an XML document to HTML. There are other options for XSL files. They can, also, be XPath, which is a language used to access elements in an XML document. Or, they can be XSL Formatting Objects. XSL-FO is a vocabulary for formatting XML documents. We won't get into them here but vocabularies are sets of elements and attributes.
Line 10 indicates that our output will be HTML.
Line 12 is where things get more interesting. When we tell the parser that the template match attribute = /, we are telling it to apply the transformation to the root element in our XML document. In our case, the root element is videoStore: catalog.
Lines 13 through 15 tell the parser what we want to do to the root element. We want the parser to provide an HTML document with the specified templates applied.
And what are the specified templates? In this example, we have only 1 template. It is everything from line 18 through line 72.
Line 18 states that the template is being applied to the videoStore:catalog element in our XML document. For the template itself, we lay things out as if it was an HTML document except we are going to use element references instead of raw data.
As with our other HTML documents, we start with a head. If you read the HTML5 tutorial already, you will be familiar with the charset attribute and title element. The title is what will be shown on the page tab.
In the body, we can use standard HTML tags to separate sections and apply formatting. We can, also, add text. As you can see in lines 25 and 26. "Store number:" and "Managed by:" are not part of our XML but we want to add them to our HTML page using h3 and h4 formatting.
In lines 27, xsl:value-of select = is an XPath statement that tells the parser we want to pick some data out of our XML document. Specifically, we want it to grab whatever data is stored with the address tag within the contactInfo tag within the store tag. If you refer back to the XML document, you will see this structure.
Lines 25 and 26 add to the select with a concat function. This is, actually, an embedded JavaScript function. Here, we are telling the parser to place a space between Store number: and the data associated with the XML storeNumber element.
In line 31, we tell the parser we want to create an HTML table. The column headings are listed in lines 35 through 38.
For our table, we want to pull data from the movieLibrary/movie section of our XML document. That is the meaning of the for-each in line 41. For each of the movies, we want the parser to sort them by title. The sort is specified in line 42.
In XSL we can perform a variety of sort types on different kinds of data. Since I have not included other attributes the parser assumes it is dealing with a string data type and that I want the data sorted in ascending order. We could specify descending order if we wanted by adding: order = "descending" to line 42.
Lines 44 through 47 indicate the data we want added to our table.
The second table we want the parser to build demonstrates an if conditional. We want only the PG-13 movies shown.
This concludes our brief introduction to XSL documents. As you might have gathered, there are many ways to style and organize data. This is a very small sampling of what you can do with XSL.
Lastly, we are going to look at schemas and DTDs. These are used to make sure that the data in XML documents meets some structure criteria.
Here is a schema to check the data in our XML document.
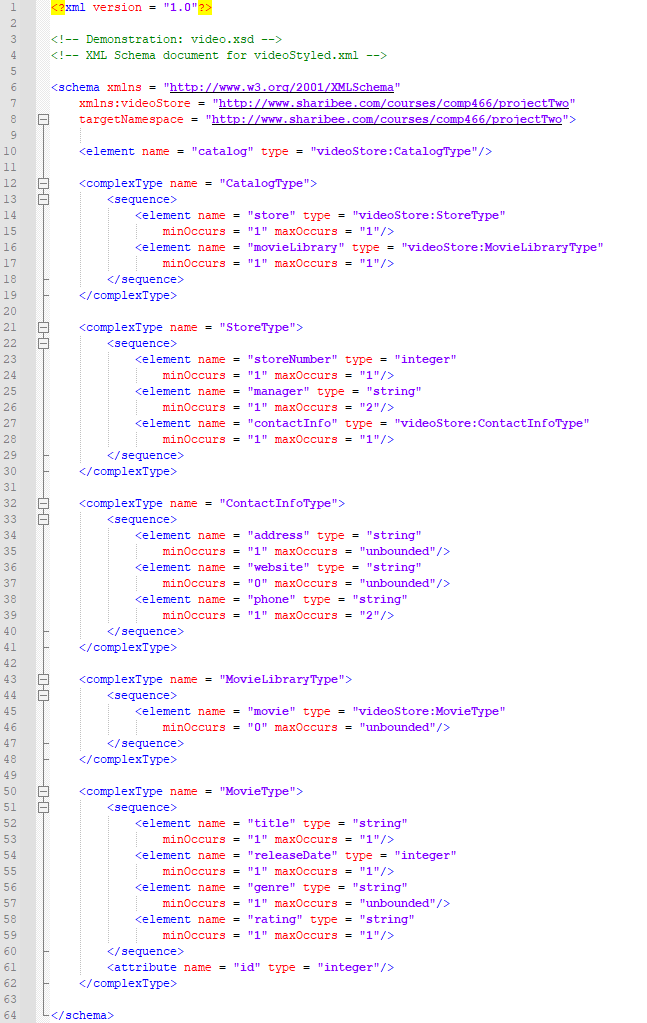
Like our other documents, this one start off with the same structure for lines 1, 3, and 4.
Then, in lines 6 - 8, we deal with namespaces. Line 6 specifies the default namespace. Since this is a schema, we point to W3's XML Schema page. The second namespace is the same videoStore namespace we used in the other documents. Line 8 is different from what we've seen so far. Here, we are specifying the name space that this schema is meant to validate. In other words, the schema's target.
Schemas are all about defining data types. When working through a schema, I like to picture a tree structure. My root data type is at the top. It is made up of other data types. Those types are, then, made up of more data types and so on down to the last level of the tree which is made up of only built-in data types.
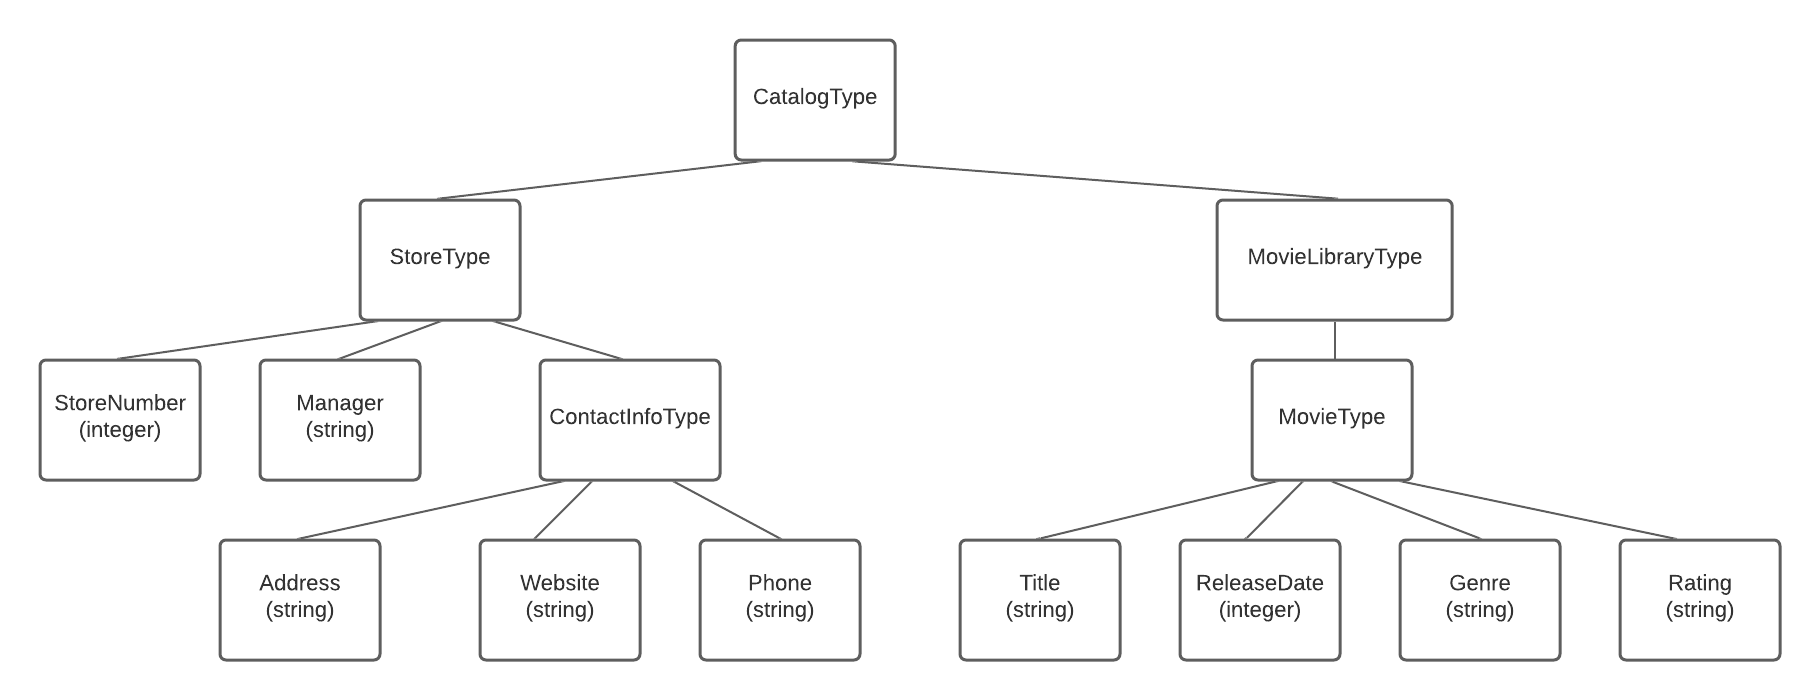
After you have the structure figured out, you can determine if you need to include other attributes. We used minOccurs and maxOccurs to specify how many of each element should be included.
The tags used specify different structures. For example, each defined type is listed as a complexType. Using the ComplexType tag tells the validator that the data type will have children and/or attributes. A SimpleType cannot have either of those.
The Sequence tag (indicator) used in the data types tells the validator that we want the elements listed to be in the order we have laid out. Instead of Sequence, we could have used either Choice or All. Choice would indicate to the validator that we want one of data types included. All indicates that we want all data types to appear but we don't care what order they are in.
The last part of this document that we will point out is the Attribute in line 61. If you recall from our XML document, Attributes are data values specified within tags. Here, we tell the validator to make sure that our id attribute is an integer.
Document Type Definitions perform the same general function as schemas but the syntax is quite different. Schemas use syntax that comes from XML and DTDs do not. Overall, DTDs don't provide as much control over the structure as Schemas. We won't cover DTD syntax here but I encourage you to research it.
You may, at this point, be asking yourself how to use a Schema. That is a very valid question. There are some online validators that allow you to copy and paste your code to check your XML against your XSD. My personal favourite is this one from Liquid Technologies: XSD Validator. It is one of the few that gives feedback about why your document isn't valid, if that is the case.
The last topic we will cover in this tutorial is Ajax. Imagine filling out a form online. In this form, you have to enter your contact information. There is no example or instructions given about how they would like your phone number formatted so you enter it as 123-456-7890. You proceed to fill in the rest of the form then hit the Submit button. The form processes then gives you a message stating that your phone number is in an incorrect format. You now have to scroll through form to find your phone number, fix it, and hit Submit again. Make sure to keep your fingers crossed that there are no other errors! Now, imagine a form that gave you a message as soon as you entered your phone number or better yet, a form that automatically filled in parts of your address for you after you entered your postal code. These conveniences are made possible with Ajax.
Ajax allows for asynchronous communication between the client and the web server. While you are continuing to fill out the form the program is sending HTTP messages and updating the Web page.
Ajax stands for Asynchronous JavaScript and XML. It is a tiny bit of code that can make your website so much better.
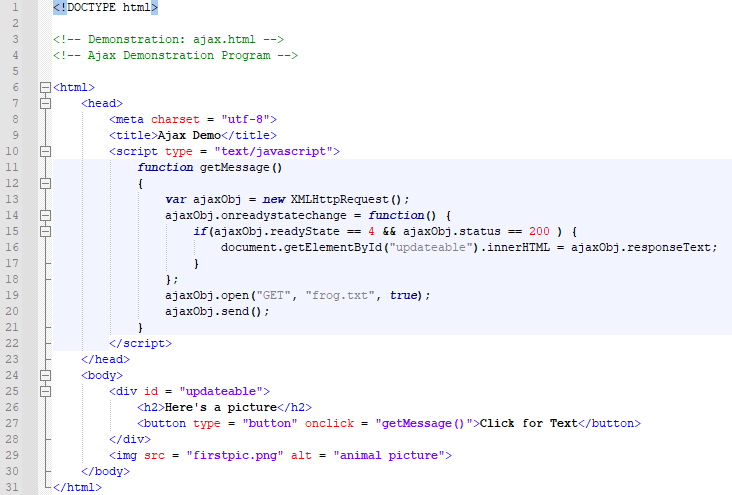
To use Ajax, first, create a new XMLHttpRequest object then use that object to do a variety of things without having to reload the page. You can request assets from a web server, you can update the web page, or you can send information to the web server all in the background without any interruption to the user.
When this script is executed, some text, a button, and an image are loaded. When you click the button, it and the text are replaced with other text. You can see that the page was not reloaded because the image doesn't have to reload.
In Line 14, the onreadystatechange function is similar to adding an event listener. It's what we use to make sure the HTTP request has been sent, the response has come back, and the request was successfully fulfilled.
This is only a brief example of what Ajax can do. To make the most dynamic web pages with the most user-friendly forms, I encourage you to research further into Ajax.